WordPress Simple Guide – Step by Step Tutorial (Part 1: Setup)

WordPress Simple Guide - Step by Step Tutorial 2022 by 3 Mini Monsters

Are you looking to build a website for your business or a landing page for your marketing campaign?

Or are you a business owner or a startup founder who have an idea which you are planning to validate the business model within your targeted market?

Or maybe you just want to build a simple website for your project.

WordPress is one of the best way to build a website because:

WordPress is a free and open source content management system (CMS) based on PHP and MySQL. It is the most widely used CMS software in the world, and as of June 2021, it powers more than 40% of the top 10 million websites and has an estimated 64% market share of all websites built using a CMS.

WordPress Simple Guide - Step by Step Tutorial 2022 by 3 Mini Monsters

I made this WordPress simple guide in the hope that can help more users to build their website on their own in order to grow their business and brand.

If you are not planning to do it yourself, you may contact us for your website design and development.

Here is an overview from start to finish of all the steps we’ll walk you through in this guide:

  • How to search and register a domain name
  • How to find and subscribe a web hosting for WordPress
  • How to install WordPress
  • How to install a WordPress theme/template 
  • How to add new plugin into WordPress
  • Creating pages in WordPress
  • Creating posts and categories
  • How to customize your WordPress with plugins and templates
  • Advanced topics liked building Ecommerce store, booking website and landing page that converts etc.
Let’s get started. Do remember you do not need to be a web developer or programmer to be able following this tutorial as I’m making this as simple as your child can learn too, cheers!
 

Topic 1:

Domain Name is Your Brand

First thing you need before you start building a website is your domain name.

Easiest way to register your domain is go to any domain registrar and search you business name with .com or country code top-level domain.

I would recommend using Namecheap as I have been using their service and entire domain registration experience is great.

Click this link to register your new domain: https://www.namecheap.com

Or sometimes some web hosting companies will offer free domain name when you purchase their hosting plan liked Bluehost, you will get Free 1st Year Domain Name when you purchase their most affordable plan, starting at $2.99/mo. Click here to grab this offer. 

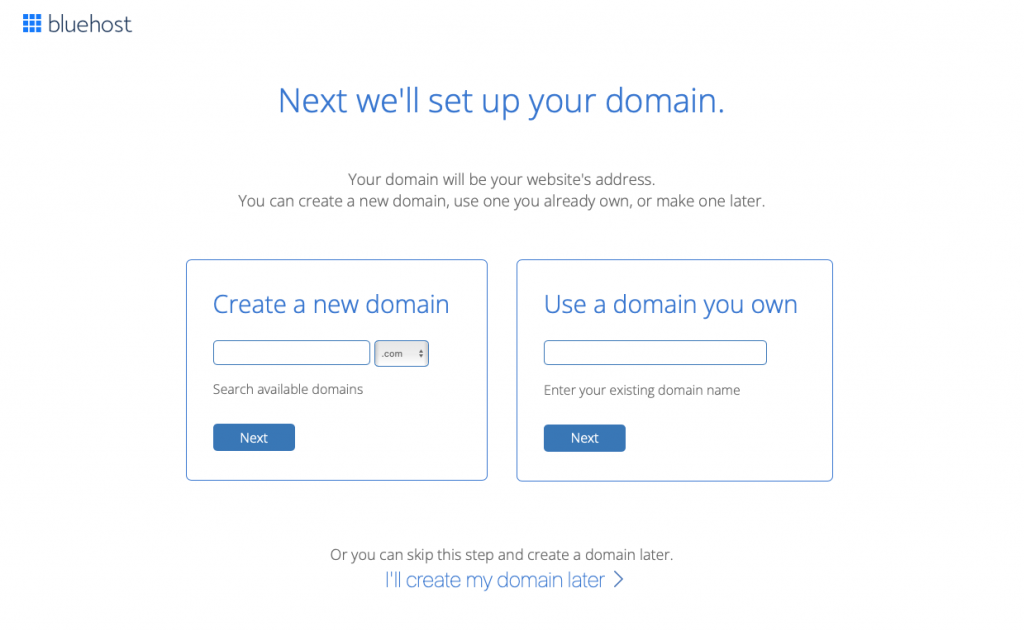
Step 1: Type your wanted domain name in the search field within the top banner. For example: buildwebsite101.com

Step 2: After you click ‘Search’, a list of domain names will be shown, you can add to cart for those available.

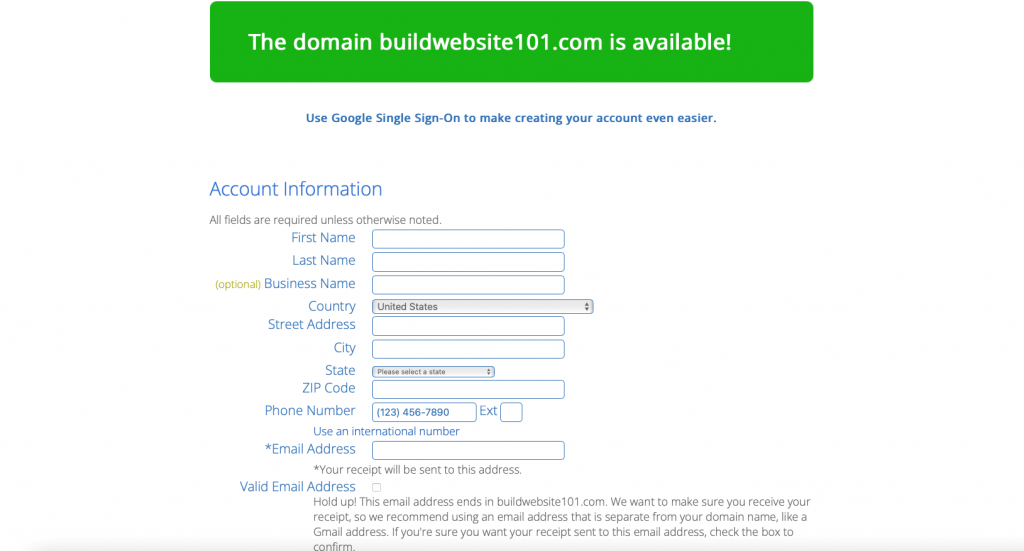
Step 3: From my Step 1 search example, I choose “buildwebsite101.com” and click “Add to cart”.


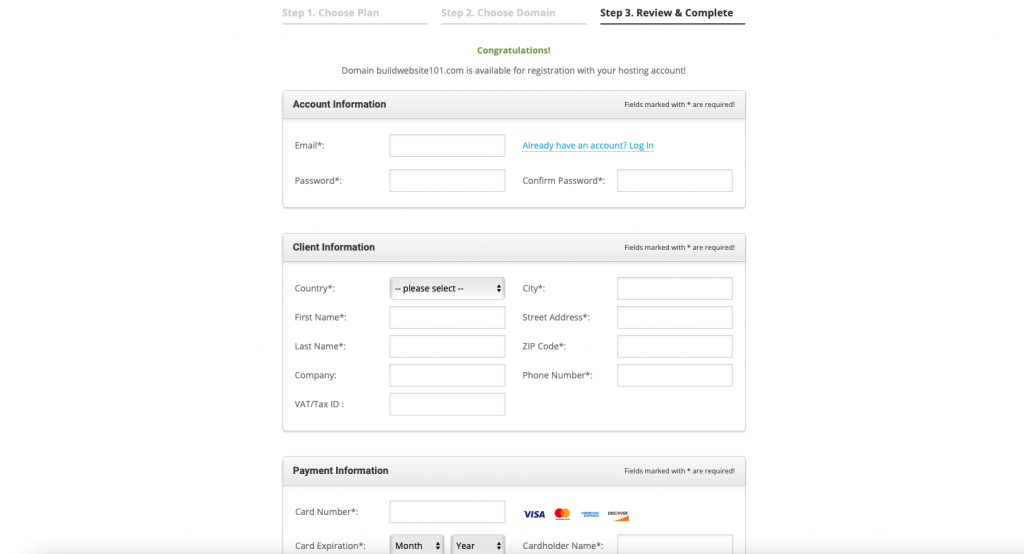
Step 4: Checkout and sign up a new user account for your new domain.

Step 5: After you made the payment, you will receive a confirmation email form Namecheap.

Done!

Topic 2:

Web Hosting is Your Home

Second thing you need before you start installing WordPress is your web hosting.

I would recommend using Bluehost or SiteGround as I have been using their service and both are good WordPress-optimized servers which recommended by WordPress.org.

Click below link to register your new web hosting plan:
https://www.bluehost.com/ – Starting at $2.95/mo


Option 1: Bluehost (Choose WordPress made easy plan, click 'Start Building')

After you click ‘Start Building’, you will see a page to choose pricing plan.

Do select The Most Popular one – $2.95/mo* for 12 months term.

Choose the most popular Bluehost web hosting using Bluehost | Recommended by 3 Mini Monsters

After you click ‘Select’, you will see a Free Domain page.

Go for “Create a new domain” form if you do not have existing domain. For example, I fill in ‘buildwebsite101’ and stay with .com, click ‘Next’ to search available domains.


Free Domain for Bluehost web hosting using Bluehost | Recommended by 3 Mini Monsters

And after fill in the new domain, the next step is to complete your account information. And proceed to payment as the final step.

Account Information for Bluehost web hosting using Bluehost | Recommended by 3 Mini Monsters

After completing your purchase above, you will receive an email with instructions on how to login to your web control panel , also known as cPanel. This is where you install/login to your new WordPress website.

You can click “Log in to WordPress’ button at cPanel dashboard or you can browse the url liked [yourwebsite.com]/wp-admin to access WordPress dashboard.

Option 2: SiteGround (Choose WordPress Hosting)

https://www.siteground.com – – Starting at $3.99/mo

After you click ‘View Plans’, you will see a page to choose pricing plan.

Do select the StartUp or GrowBig plan which the main difference is unlimited websites for GrowBig plan but only 1 website for StartUp plan.

SiteGround pricing plans for WordPress hosting

After you click ‘Get Plan’, you will see a “Step 2. Choose Domain” page.

Go for “Register a New Domain” form if you do not have existing domain. For example, I fill in ‘buildwebsite101’ and stay with .com, it will display a domain registration fee as below: 

$17.99/year


Register New Domain for SiteGround web hosting using Bluehost | Recommended by 3 Mini Monsters

Click ‘Proceed’ and go to Step 3. Review & Complete where you need to fill in all Account and Payment Information.

Account and Payment Information at SiteGround

After completing your purchase above, you will receive an email with instructions on how to login to your SiteGround control panel, where you can install/migrate/install your new WordPress website.

Topic 3:

Install WordPress (Depend on your web hosting)

Option 1: Bluehost

If you purchased a Bluehost Shared Hosting account, Bluehost will install WordPress automatically upon the completion of signing up for an account. For any other hosting plan, the option to install WordPress with one click will be available to you in your customer control panel.

Option 2: SiteGround

Check out this official article from SiteGround to continue WordPress installation, it will briefly take you 5 mins.

Option 3: Manual Install on Other Hosting

You may follow this handy guide by WordPress which is a very simple process and takes less than 5 minutes to complete.  


Topic 4:

Install Your First WordPress Theme

Step 1: First thing you need to learn in WordPress development is “Themes“. 

Do go to menu “Appearance > Themes” and here will list down all installed or inactive themes. 

WordPress Themes Page

Step 2: After clicking “Add New” button on top of the Themes page, you will be redirected to “Add Themes” page where you can search, sort by popular, latest  and favourites WordPress theme which are free to install and use, you can see over 4k themes are available at below screenshot.

WordPress Add Themes Page by 3 Mini Monsters

Step 3: Click “Install” when you mouseover the theme thumbnail, then “Activate“.

For this tutorial, I would recommend you to install Astra, a fast, fully customizable & beautiful WordPress theme suitable for blog, personal portfolio, business website and WooCommerce storefront. It is very lightweight (less than 50KB on frontend) and offers unparalleled speed. 

All you need to do is just type “Astra” in the top right corner field “Search themes…” and auto search will happen. Click the theme with name “Astra”, and click “Install” then “Activate” afterwards.

WordPress Install and Activate Astra Theme by 3 Mini Monsters

Step 4: After clicking “Activate” button on Astra theme, the theme will be installed and the notification bar will be displayed so that you can click “Get Started” button to continue.

WordPress Astra Get Started

Step 5: Next, click “Build Your Website Now” button at the bottom nav to continue.

WordPress Astra Get Started Page

Step 6: Next, you will see a Page Builder options page. I would recommend to use “Elementor” as it has more support and larger community.

WordPress Astra Page Builder Options

Step 7: Finally, you will come to a page with headline “What type of website are you building?” with lots of website template screenshots to be clicked and import whole website/single page. 

WordPress Astra Select a Website

Step 8: For this tutorial, I will choose the E-Commerce theme “Brandstore” which is FREE, and you can choose any other theme screenshot without “Premium” label on top of that.  

For Premium-label theme, you may click “Get Essential Bundle” button at the bottom to purchase unlimited access for all Premium Starter Templates. Or you can click here to find out more.

After you selected “Brandstore” theme, the next page will have the options to upload your logo (180 x 60 px) or you may click “Skip & Continue”. 

WordPress Astra Free Starter Template - Brandstore

Step 9: Next, you will have the options to change default theme colors and fonts before clicking “Continue”.

WordPress Astra Free Starter Template - Brandstore (Color and Font)

Step 10: Last step before creating your entire website, you may subscribe the newsletter or just click “Submit & Build My Website”. Then you will see a building website progress page, you may go to make a coffee and come back 🙂

WordPress Astra Free Starter Template - Brandstore (Submit & Build Website)
WordPress Astra Building Website using Starter Template

Finally, I saw this “Congratulations” page after making my coffee. Hooray, my website is up and running!

WordPress Astra Free Starter Template - Brandstore (Imported Successfully)

Do click the link “View Your Website” to have a look at your new website, I bet you are curious and excited right now.

WordPress Astra Free Starter Template - Brandstore Website Homepage

To learn more about how to personalise and customise your imported website, do watch the video by Astra team.

Hope you enjoy watching how to personalise your new website.

Topic 5:

Install Your First WordPress Plugin

The second most important module you need to learn about WordPress is “Plugins“.

Previous part we have covered “Themes” and teach you how to build your entire new website using Starter Template way.

You can see all installed plugins by clicking side menu “Plugins” at WordPress admin.

WordPress Plugins List by 3 Mini Monsters

From the Plugins page, you can click:

  1. “Activate” link: to activate installed plugin to add additional functionality to your website.
  2. Delete” link: to remove inactive plugin from your website.
  3. update now” link: to update some of the plugins with latest version.
  4. Settings” link: to access the plugin main settings page directly.
  5. Deactivate” link: to disable or deactivate current active plugin.

So from the screenshot above, i have deleted 2 default plugins and click “update now” for the Starter Templates plugin. Let’s see what happen now.

WordPress Plugins List After Delete and Update Now by 3 Mini Monsters

Now let’s add new WordPress plugin and activate it within a minute.

First, we need to click “Add New” button on top left of the Plugins page to display all available free WordPress plugins.

WordPress Add New Plugin List by 3 Mini Monsters

3 Steps to Install New Plugin >>

WordPress Add New Plugin Step 1 by 3 Mini Monsters
Step 1: Install
WordPress Add New Plugin Step 2 by 3 Mini Monsters
Step 2: Activate
WordPress Add New Plugin Step 3 by 3 Mini Monsters
Step 3: After Activated
Scroll to Top